How to Winterize Your Outdoor Kitchen on Lake Norman
Protect your Lake Norman outdoor kitchen during winter. Step-by-step winterization guide for plumbing, appliances, countertops, and pavilion structures.
Outdoor Kitchens LKN Team
We see this scenario play out every winter on Lake Norman. Homeowners invest heavily in beautiful backyard setups, then overlook the cold-weather vulnerabilities of their equipment. Lake Norman’s mild winters create a false sense of security. Daytime highs in the 50s feel manageable, but the occasional January hard freeze causes serious damage to unprepared outdoor kitchens. As outdoor kitchen specialists serving the LKN region, we have watched preventable problems like burst water lines and cracked countertops cost homeowners thousands to repair.
Taking a few hours each fall to winterize properly ensures everything is ready when spring arrives. This guide walks through the complete winterization process for the lake region’s specific climate.
Why Winterization Matters on Lake Norman
The lake region experiences average winter lows of about 29 degrees, but extreme cold snaps can drop into the teens overnight. Even brief freezing temperatures can:
- Burst plumbing lines, ruining the kitchen and damaging surrounding hardscape
- Crack stone countertops with trapped moisture
- Damage appliance components left exposed to freeze-thaw cycles
- Allow water intrusion into stone veneer that fails as it freezes
The lake region’s humidity adds another wrinkle. Sustained winter humidity causes condensation issues on appliances and accelerates corrosion on cheap hardware. Proper winterization addresses both freeze risk and humidity damage.
When to Winterize on Lake Norman
The optimal winterization window runs from late October through mid-November. By this point, the kitchen is finished with regular use but the first hard freeze is still typically a month away. Working in 50-60 degree weather is far more pleasant than scrambling when a cold front approaches.
Final winterization should be complete before the first night that drops below 32 degrees. Forecast watching is a habit during October and November.
Step 1: Plumbing System Shutdown
Plumbing is the most freeze-vulnerable system in any outdoor kitchen. Failure to winterize pipes can result in burst lines that flood the kitchen and the surrounding patio.
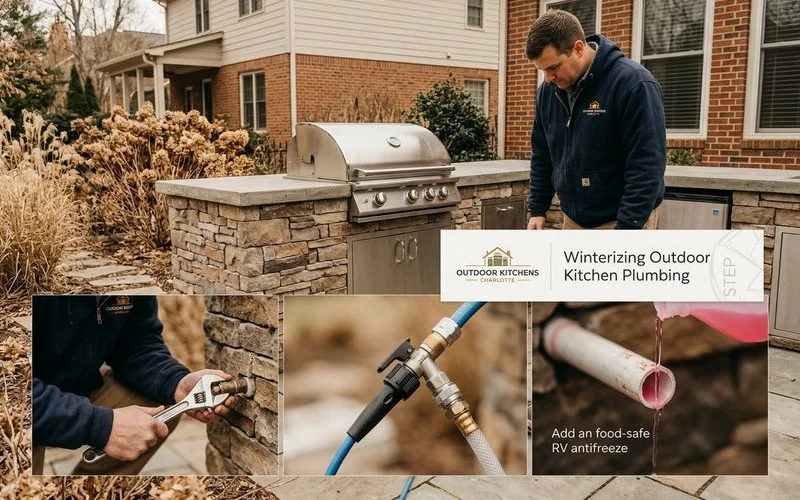
Complete plumbing winterization steps:
- Locate the indoor shutoff valve that controls water supply to the outdoor kitchen. Close it fully.
- Open the outdoor faucet and any sink taps to release pressure and drain the lines.
- Connect a compressor to the outdoor line and blow compressed air through to clear remaining water. Most homeowners hire this out, or we handle it during annual maintenance.
- Drain any traps that may hold water (P-traps under sinks, ice maker supply lines).
- Pour RV antifreeze into drain traps to prevent freeze damage to remaining trap water.
- Disconnect any garden hoses still attached to outdoor taps.
- Cover or remove any small backflow preventers, which are vulnerable to freeze damage.
If your kitchen has an ice maker, beverage center, or refrigerator with water connection, fully empty those lines and let the appliance drain.
Step 2: Appliance Preparation
Each appliance needs specific winter preparation:
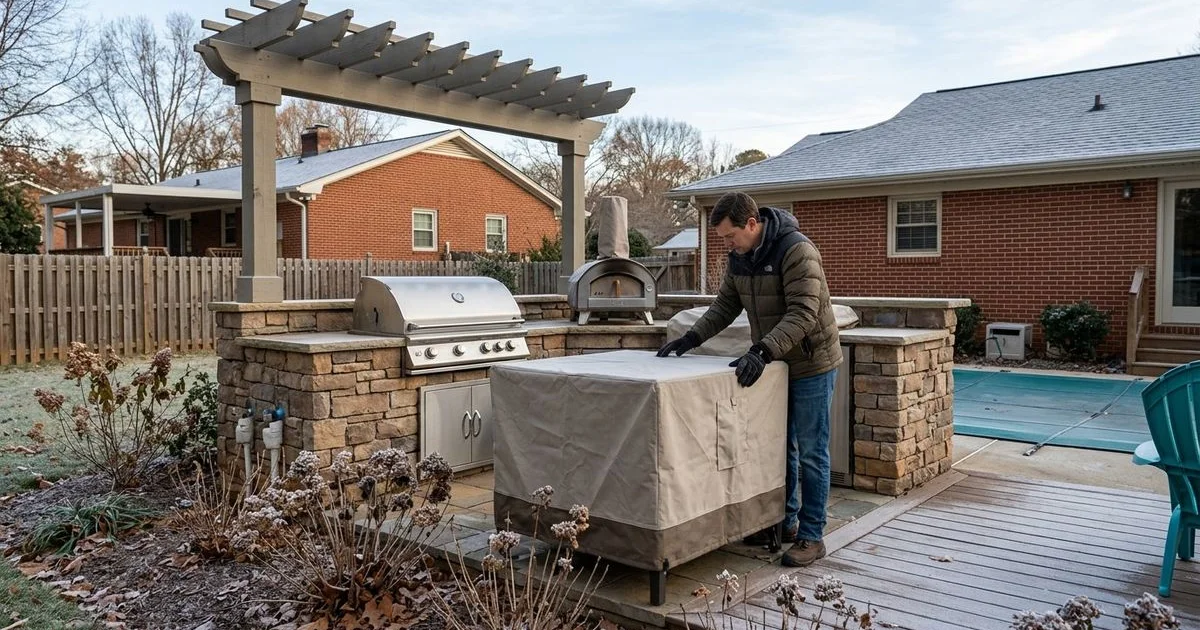
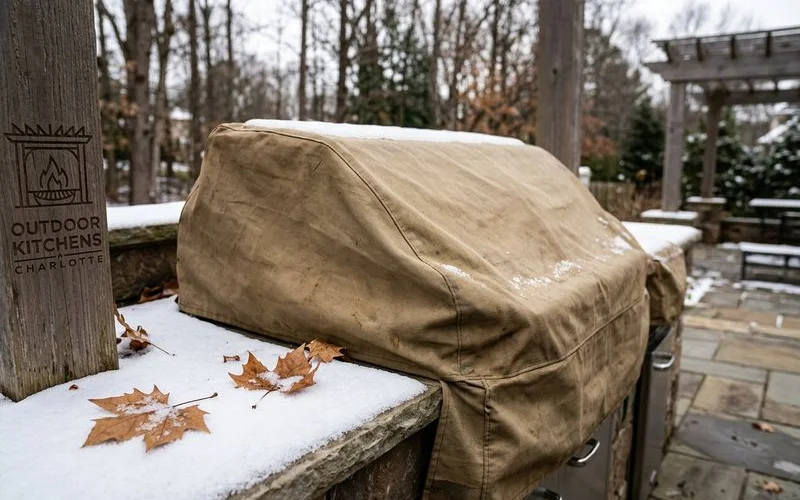
Built-in grills. Clean thoroughly. Wipe down all stainless surfaces. Apply a stainless steel polish to provide a barrier against winter humidity. Cover with a fitted vinyl cover.
Pizza ovens. If gas-fired, simply cover. If wood-fired, brush out residual ash, allow to fully cool, and cover.
Outdoor refrigerators and ice makers. Either keep running through winter (preferred for refrigerators that hold food) or fully shut down, defrost, drain water lines, prop the door open, and cover. The “leave it running” approach works on covered patios where temperatures stay above freezing inside the cavity.
Beverage centers. Same approach as refrigerators.
Side burners and power burners. Clean thoroughly, cover.
Outdoor heaters. Inspect before first use of the cool season. Most infrared heaters operate fine through winter; just ensure the gas supply line is properly sealed.
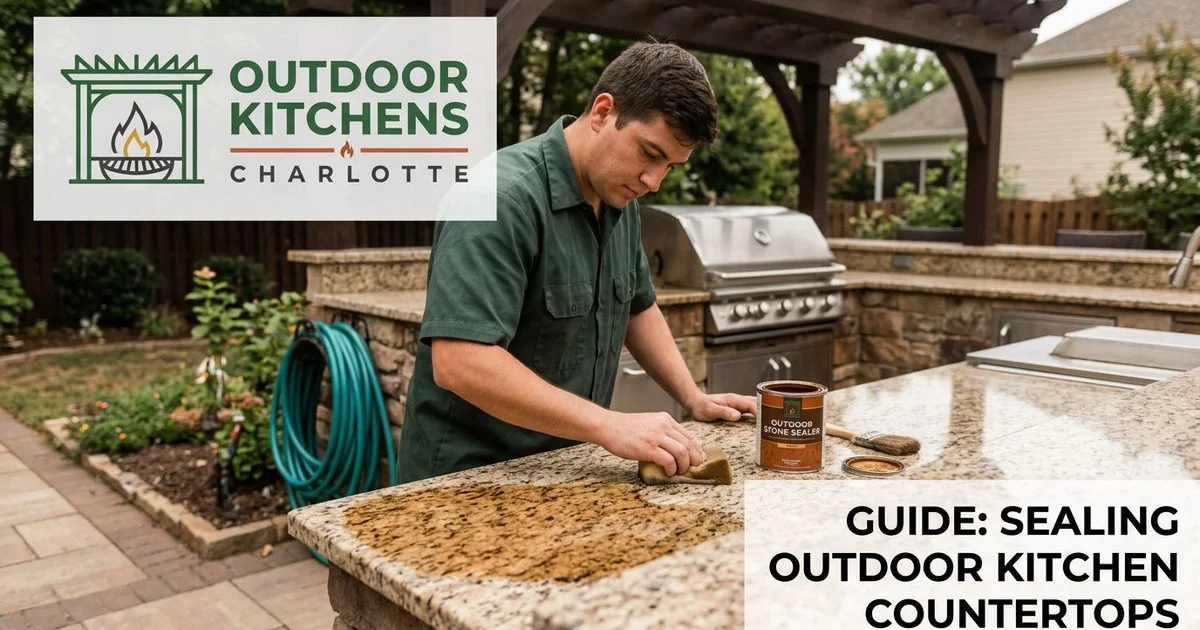
Step 3: Countertop Protection
Stone countertops are surprisingly vulnerable in winter. Trapped moisture in unsealed stone can freeze and crack the surface from within. Proper winter prep:
- Apply or refresh annual sealer if not done already (October is the perfect time).
- Clean and dry the surface thoroughly.
- Cover the countertop with a protective tarp or fitted cover during extended unused periods.
- For exposed corners and edges, watch for any cracking through the winter months and address quickly if seen.
For more on sealing, see our guide on how to seal outdoor kitchen countertops.
Step 4: Stone and Masonry Inspection
Lake humidity combined with freeze-thaw cycles works on stone veneer over time. A pre-winter inspection catches problems before winter makes them worse:
- Check mortar joints for cracks or gaps. Small gaps allow water infiltration that freezes and expands.
- Look for any spalling on stone surfaces (small flakes coming off).
- Inspect grout lines on tile or porcelain surfaces.
- Address any concerns now while the weather is still mild.
For stone fireplaces and chimneys, schedule a professional chimney inspection if the unit will be used through winter. Cracks in firebrick or chimney mortar can cause carbon monoxide issues if the fireplace is fired up while damaged.
Step 5: Pavilion and Cover Preparation
Pavilions and pergolas need their own winter prep:
- Clear leaves and debris from pavilion roofs and gutters.
- Inspect roofing for any storm damage from fall.
- Check ceiling fan blades for any wobble or balance issues.
- Test all outdoor lighting before the early-sunset months.
- For motorized louvered roofs, run a full cycle to verify the motor and louvers operate correctly.
- Lubricate any mechanical components per the manufacturer’s winter guide.
For more on covered structures, see our guide on pergola vs pavilion for your outdoor kitchen.
Step 6: Fire Feature Preparation
Outdoor fireplaces and fire pits get heavy use during fall and winter on Lake Norman. Pre-winter prep:
- For wood-burning units, schedule chimney sweeping and inspection.
- For gas units, inspect burner assembly and test ignition.
- Top off propane tanks for tank-fed gas fire features.
- Stock seasoned firewood under cover (oak and hickory burn cleanest).
- Test gas shutoff valves to confirm they operate freely.
Our outdoor fireplaces and fire pits service includes annual fire feature maintenance for clients.
Step 7: General Winter Use Plan
Lake Norman is mild enough that many homeowners use their outdoor kitchen through winter. If that is your plan:
- Keep gas appliances accessible (no winter cover that has to be removed for each use).
- Plan for the days you will use the kitchen, schedule wood deliveries, and stock the outdoor refrigerator if it stays running.
- Have a heater plan (infrared overhead, fire feature, or both).
- Inspect everything monthly for any issues that develop.
For homeowners who do not plan to use the kitchen until spring, full lockdown winterization is appropriate. Cover everything, drain all water, and leave the kitchen alone until April.
Spring Reactivation
When spring arrives (typically mid-March on Lake Norman), reactivation reverses the winterization steps:
- Remove covers and inspect for any winter damage.
- Turn water supply back on at the indoor shutoff.
- Run water at all faucets and taps to verify no leaks.
- Test ice makers and refrigeration appliances.
- Reseal any countertops that show wear.
- Light gas appliances and verify ignition and operation.
- Inspect stone, mortar, and pavilion structures for any new damage.
- Schedule any professional maintenance needed.
For most clients, spring reactivation takes 2-3 hours. Lake Norman summers reward the effort with months of comfortable outdoor cooking.
Annual Maintenance Service
If winterization sounds like more work than you want, Outdoor Kitchens LKN offers a full annual maintenance program. We handle pre-winter shutdown, mid-winter inspection (especially after hard freezes), and spring reactivation. Pricing typically runs $400-$800 depending on kitchen size and complexity.
Reach out to our team to schedule winterization or to discuss the annual maintenance program. Protecting your Lake Norman investment through winter is one of the smartest things you can do, and it ensures the kitchen is ready when the boats come off the lifts in March.
Outdoor Kitchens LKN Team
Outdoor Living Design Specialist
15+ years designing outdoor kitchens across the Lake Norman region.